CCTV Online
| SOLO, CENTRAL JAVA, INDONESIA - Jl.Slamet Riyadi |
| Ngadirojo, Wonogiri, CENTRAL JAVA, INDONESIA |
| YOGYAKARTA, INDONESIA |
CCTV Camera Long Exposure Control Circuit
| The circuit was designed to control long exposures of the CCTV camera using a simple AT89C2051 microcontroller. It can be used with modified B/W cameras based on Sony chips CXD2463R ( CCD timing control ) and CXA1310AQ ( CCD signal processing ). These ICs may be found with Sony HAD CCD sensors in small board cameras with "1004" or "1043" designations. |
| The circuit contains slightly more transistors and resistors than necessary. It is useful to have the camera in the "normal" autoexposure mode when the MCU is started or even if the MCU socket is empty. Software functions are controlled and monitored by five push buttons and three LEDs. MCU ports assignment may be different - it depends on software. The schematic described below allowed me to design a simple single sided prototype PCB. There are four unused port pins for future developement : UART RX/TX for the remote control ( computer serial port connection ) and analog comparator inputs which may be used e.g. for supply voltage checking. |
 |
| Exact values of resistors are not critical as well as types of transistors and diodes. I used BC547 ( NPN ) and BC557 ( PNP ) transistors, 1N4148 diodes and SMD resistors and capacitors with values listed in the schematic. I can't provide a PCB layout of the daughterboard because the original prototype design was slightly different ( more complicated ) and I modified it using the original PCB which is now not optimal for this final version. I'll prepare some "production model" in the future. |
| The CXA1310AQ amplifier gain control circuit ( at the top - one switch, potentiometer and two resistors ) is optional. It is not related directly to long exposures but it helps to obtain a desired image brightness when the AGC output is not optimal. Sometimes a minimum noise is more important than the maximum gain. |
| I/O description |
| Connections to the camera board are denoted by the IC pin numbers. "A" means the CXA1310AQ chip, "D" means CXD2463R and "C" is for CCD sensor pins. Following camera connections are used : |
|
| SYNC and BLK signals were originally brought to drive an embedded digitizer and capture circuit which is not completed yet ( I have a problem digging up some special parts ). |
| It is necessary to decouple +5V, +12V and +15V power supplies by capacitors because the MCU frequencies interference may cause some strips or noise in the CCD signal. If there are problems with a correct decoupling I recommend following measures : |
|
| It is possible to test the circuit without any MCU in the socket. Control ports P1.4 .. P1.7 ( pins 16 .. 19 ) are pulled high and the camera should work in the "normal" mode without the MCU. Shorting the pins to the ground ( pin 10 ) should switch corresponding functions. |


link to CCTV Forum
| cctvforum.com | row 1, cell 3 | |
| cctvforum.com | row 2, cell 2 |
opensource.telkomspeedy.com Indonesian Forum
ezcctv.com
/forum-indoflasher.com Indonesian Forum
opensource.telkomspeedy.com
ezcctv.com
cctvforum.com
securityinfowatch.com
closeprotectionworld.com
cctvchat.com
Web Server
| Using DNS2P with Windows and
Linux versions of the Apache web server |
| Many DNS2P users want to run their own web server
with multiple web sites on their home server.
Using Microsoft IIS can be a big issue with
worms and viruses, and sometimes the DNS2P Windows
web server can't perform some of the advanced
tasks that Apache can. |
| Since Apache is the world's leading web server,
we get plenty of inquiries about running the
Apache Web server on both Windows and Linux.
Apache 2.0 is a recent release of the world's
best web server, and due to many improvements,
we wanted to bring you a tutorial on configuring
the Apache server to run your domain(s). |
| In this tutorial, we have the DNS2P Windows
software running on our server, and have added
the domains 1.dns2p.com, 2.dns2p.com, and 3.dns2p.com.
Once we get everything tested with these DNS2P
subdomains, we can purchase additional private
domains from DNS2P and add them into our server
later once everything is working. |
| Our Linksys NAT router has a LAN address of 10.1.1.254 and the routers WAN IP address is
Dynamic, so it could change anytime. The first
thing we need to do is download and install
the Apache 2.0 server for Windows. |
| Download Apache 2.0 for Windows here: |
| http://www.apache.org/dist/httpd/binaries/win32/ |
| Get the file named: apache_2.0.36-win32-x86-no_ssl.msi
* this is the latest working version without source for Win32, Newer versions may be avail here Documentation for Apache 2.0 is here: |
| http://httpd.apache.org/docs-2.0/ |
| Install the server by clicking on the MSI file.
Install the Apache server to the default path
of C:\Program Files\Apache Group as shown in
the shot below. |
 |
| The Server will ask your domain name and server
name, in our case, our first and primary domain
name is 1.dns2p.com, and our server name is
dubserver.1.dns2p.com (See Example below) |
 |
| Once the Server is installed you will see the
Apache server monitor in the System tray near
the clock as shown. The Apache Monitor icon
is to the far left, the feather with the play
button in the middle. When the server is stopped,
the symbol changes to a red stop button. |
| Now that we have the Apache server running,
we want to stop the server, then edit the httpd.conf
file located in the C:\Program Files\Apache
Group\Apache2\conf directory. To Stop the server,
right click on the Apache Server monitor icon
as shown above, then click "OPEN APACHE
MONITOR" - and select the STOP button to
stop the server. (See screenshot of Apache Server
Monitor below) |
 |
| Make a backup of your httpd.conf file! Now,
once you make the backup, edit the httpd.conf
in Notepad for your name based virtual host
IP, Port and virtual host names. Open the httpd.conf
file located in the C:\Program Files\Apache
Group\Apache2\conf directory with a simple text
editor such as Notepad. (See an example of the
directory below, highlighted folders are the
2 folders mentioned here in this tutorial for
configuring and adding HTML content) |
 |
| Scroll down to the bottom of the httpd.conf
file and find the section with "NameVirtualHost"
as shown below for virtual hosts. By Default,
Name based virtual hosts are turned off and
we need to turn them on and add in our virtual
hosts, then restart the server. Apache loads
the .CONF file configuration every time the
server is started or restarted, so once we save
this file and restart, our changes should be
in-place. |
IP Address Change And Renew
| function |
|
Imagine if your Phone number changed once a week, once a day, or once a month! Nobody would ever know what number you are using. Your Internet connection works exactly like this! Instead of having your IP ADDRESS change frequently, DNS2P lets you select a domain name that never changes! Using DNS2P, you can continue to keep your Dynamic IP and simply use our Dynamic DNS to give your location a fixed domain name. You never need to worry about your IP address changing again! |
|
A dns2p client helps give you a static name for a dynamic connection IP. Whenever your Internet IP changes, your,dns2p client (running at the server site) will send notification to thedns2p server. |
| Static Domain Resolve |
|
dns2p can support the traditional static domain resolve, and make the domain administration more easier and convenient. |
|
Free Support |
|
For some customers who has no domains, we can offer them the dns2p.cn, dns2p.com, dns2p.net, DIPNS.COM;DIPNS.NET;IP88.NET,it is no need to apply these secondary level domains from other domain providors, we can do it immediately for you ,and the domain is free. |
|
MX Record It is no need to setup expecially, we can offer our customers the record of MX, then, the email of internet can mail to the customers' mail server IP precisely. |
CCTV
| Closed-circuit television |
| Closed-circuit television (CCTV) is the use of video cameras to transmit a signal to a specific place, on a limited set of monitors. |
| It differs from broadcast television in that the signal is not openly transmitted, though it may employ point to point (P2P), point to multipoint, or mesh wireless links. Though almost all video cameras fit this definition, the term is most often applied to those used for surveillance in areas that may need monitoring such as banks, casinos, airports, military installations, and convenience stores. departement stores Videotelephony is seldom called "CCTV" but the use of video in distance education, where it is an important tool.. |
| In industrial plants, CCTV equipment may be used to observe parts of a process from a central control room, for example when the environment is not suitable for humans. CCTV systems may operate continuously or only as required to monitor a particular event. A more advanced form of CCTV, utilizing Digital Video Recorders (DVRs), provides recording for possibly many years, with a variety of quality and performance options and extra features (such as motion-detection and email alerts). More recently, decentralized IP-based CCTV cameras, some equipped with megapixel sensors, support recording directly to network-attached storage devices, or internal flash for completely stand-alone operation. |
| Surveillance of the public using CCTV is particularly common in the United Kingdom, where there are reportedly more cameras per person than in any other country in the world. There and elsewhere, its increasing use has triggered a debate about security versus privacy. |
| Equipment | Function |
|---|---|
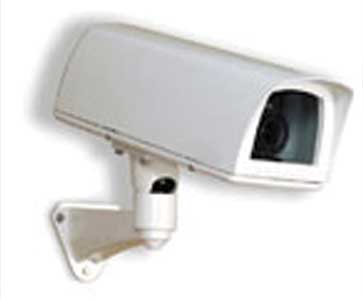 |
CCTV cameras functioning as the image makers |
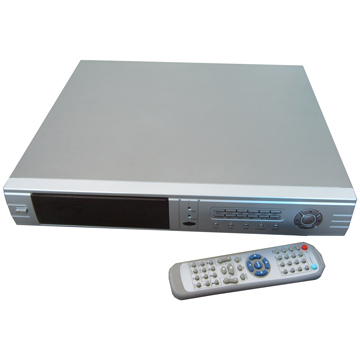 |
DVR video recorder |
 |
Monitor to display video |
 |
Cable all cables 75 Ohm, to send image data from camera to dvr |
 |
Radio sending image data remotely |
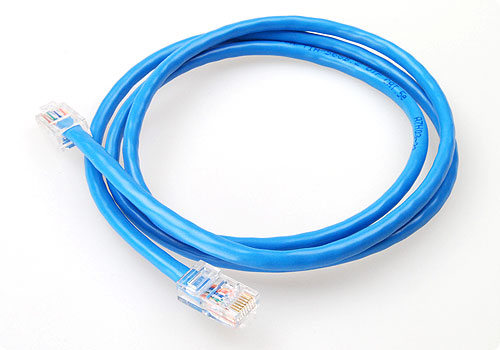 |
LAN Cable connect the dvr to the radio |
| CCTV Lens Glossary |
| Below are commonly used CCTV terms that can help you select the right lens for your CCTV application. |
| A.L.C. (Automatic Level Control) - An adjustment on video iris lenses also known as the "average to peak" control. This allows iris compensation for bright spots within the field of view either by exposing for them in particular (peak) or by taking an average across the entire scene. |
| ANGLE OF VIEW - Can be expressed in Diagonal, Horizontal, or Vertical. Smaller focal lengths give a wider angle of view. |
| APERTURE - The "opening" of the lens, the size of which is controlled by the iris and is measured in F numbers. Generally, the lower the F number, the larger the aperture and consequently more light can pass through the lens. |
| MAXIMUM APERTURE - The largest size to which the diaphragm of the lens can be opened. (The lowest f-number) |
| AUTO-IRIS LENS - A lens with an electronically controlled iris allowing the lens to maintain one light level throughout varying light conditions. |
| BACK FOCUS - A term used to describe the relationship of the distance of the lens iris (aperture) to the imager device (CCD chip). This distance is critical to maintain proper depth of field through changing focal lengths and varying lighting conditions. The back focus is achieved by adjusting the imager position or lens collar in the camera itself. It is important when using zoom lenses to ensure that correct focus is maintained throughout the zoom range. This is often referred to as "tracking". |
| BOARD CAMERA - Board Cameras are usually a fixed lens mounted on a circuit board. These cameras are often used in mini cameras, dome cameras and hidden cameras. |
| CCTV - Short for closed circuit television: A video system used in a closed environment (as opposed to public broadcast). The realm of video security and surveillance is also referred to as CCTV. |
| "C"-MOUNT - An industry standard for mounting a lens to a camera, which has a 1 inch diameter, threaded barrel with 32 threads per inch. The sensor is located 0.69 inches behind the mounting surface. A C-mount lens can be used with a CS-mount camera with the use of an adapter ring, however a CS-mount lens cannot be used on a C-mount camera. |
| "CS"-MOUNT - A relatively new industry standard for mounting a lens to a camera. Like the C-mount lens, the CS-mount lens has a 1 inch diameter, threaded barrel with 32 threads per inch. The difference is the CS-mount sensor is located 0.492 inches behind the mounting surface (where as a C-mount sensor is 0.69 inches behind the mounting surface). A CS-mount lens can not be used on a C-mount camera. |
| DEPTH OF FIELD - The areas in front of and behind the focused distance where the image remains in focus. With a greater depth of field, more of the scene near to far is in focus. Lens aperture and scene lighting greatly influences the depth of field. The larger the f-numbers, the greater the depth of field. |
| EXTENSION TUBES - Various sized spacers used between the camera and lens to reduce the Minimum Object Distance. |
| F-NUMBER - Indicates the brightness of the image that is formed by the lens, controlled by the iris. The smaller the F-number, the brighter the image. |
| F-STOP - A term used to indicate the speed of the lens. The smaller the f-number, the greater the amount of light that can pass through the lens. |
| FIELD OF VIEW - The horizontal or vertical scene size at a given length from the camera to the subject. The maximum angle of view that can be seen through the lens. |
| FIXED LENS - A fixed focus lens has one set focal length with a specific field of view which cannot be changed. |
| FOCAL LENGTH - The distance from the center of the lens to a plane at which point a sharp image of an object viewed at an infinite distance from the camera is produced. The focal length determines how much magnification a lens provides. A shorter focal length lens will be able to see a wider angle of view on a scene. A longer focal length has a narrower angle of view on the scene, but a higher level of magnification. |
| FORMAT - The approximate size of a camera image detection device. This term is used to determine the size of lens that can be used on various types of cameras. A 1" format lens will work on a 1", 2/3", 1/2", 1/3", 1/4" (and down) size cameras. A smaller format lens will not work well on a larger format camera. Using a smaller format lens on a larger camera causes distortions ranging from tunnel vision to poor back focus. |
| IRIS - The lens "iris" is a mechanical device for controlling the lens aperture (lens opening). A lens may be fixed, manual controlled and/or voltage controlled. |
| IRIS OVERRIDE - An additional circuit in an Auto Iris lens allowing the operator to switch to full control of the iris, from maximum to minimum aperture. This is particularly useful for difficult lighting situations such as strong backlighting. |
| LINE SCAN LENS - A lens designed for use in scanning lines in documents and design drawings. |
| LUX - The international unit of illumination in which the meter is the unit of length. It is equal to the illumination of a surface one meter away from a single candle. One lux equals one lumen per square meter. 10 lux equals 1 foot-candle. |
| MACHINE VISION LENS - A lens designed for factory automation purposes. The correct choice of lens can reduce image-processing requirements and improve system performance. Software cannot correct the effects of a poorly chosen lens. |
| MANUAL IRIS LENS - A lens with a manual adjustment to set the iris opening (aperture) to a fixed size. This type lens is often used in fixed lighting conditions. |
| MINIMUM OBJECT DISTANCE (M.O.D.) - The closest distance a lens can focus on an object. Generally the smaller the focal length, the shorter the M.O.D. This distance can be altered with use of extension tubes. |
| MONOFOCAL LENS - A lens having only one focal length, and therefore a fixed field of view depending on the format of the camera. |
| PINHOLE LENS - Lenses used primarily in covert applications where the camera/lens must remain hidden. |
| PRESETS - The pre-positioning of the zoom, focus, and/or iris by means of potentiometers built into the lens. |
| UV LENS - A lens intended for use with wavelengths shorter than about 380 nm. It must be made of quartz or some other material transparent to ultraviolet radiation, as glass is opaque in that region. |
| VARIFOCAL LENS - A lens that can be manually adjusted for the desired magnification and field of view. |
| ZOOM LENS - A lens with the ability to change the focal length manually or with a controller, to cover a variety of needs. |
| ZOOM RATIO - The ratio between a lens maximum and minimum focal length, e.g. a 12 to 240mm lens has a zoom ratio of 20 times (240/12 = 20). |
CCTV Lens Angle
How to choose a proper CCTV Lens for a given angle?
Different CCTV lens sizes can change the viewing angle of a security camera. Typically angle of view or CCTV lens angle can be expressed in Horizontal (HFOV), Vertical, or Diagonal. Angle of view at a given distance depends upon the focal-length of the lens and CCD Sensor size (1/6″, 1/4″, 1/3″, 1/2″ or 1″). Smaller focal lengths give a wider angle of view.In the past you would use a tables like this:
Nowadays there is an easy way to find proper CCTV lens and proper camera locations. You can use our CCTV design tools to visualize CCTV lens angles and see how modification of any parameter affects the whole design.

Different CCTV lens sizes can change the viewing angle of a security camera. Typically angle of view or CCTV lens angle can be expressed in Horizontal (HFOV), Vertical, or Diagonal. Angle of view at a given distance depends upon the focal-length of the lens and CCD Sensor size (1/6″, 1/4″, 1/3″, 1/2″ or 1″). Smaller focal lengths give a wider angle of view.In the past you would use a tables like this:
| Focal Length | 1/4″, Lens Angle |
1/3″ Lens Angle |
1/3″, Width at 10m |
| 4 | 44 | 62 | 10.9 m |
| 6 | 30 | 44 | 7.7 m |
| 8 | 22 | 33 | 5.9 m |
LinkSys Router Setup - Dynamic DNS Service
These instructions will cover how to setup Dynamic DNS Service support on a LinkSys router. We will use a LinkSys WRT54G router.
The setup process ould be similar or the same for all LinkSys routers
that support
DDNS. If these instructions do not help for your particular LinkSys
router, please consult the routers manual or
call LinkSys support to determine if your router
has DDNS capabilities. If your Internet connection has a static IP
address, it is not necessary to configure dynamic DNS service. Please
follow the below instructions to configure dynamic DNS on your LinkSys
router:
cctvcamerapros
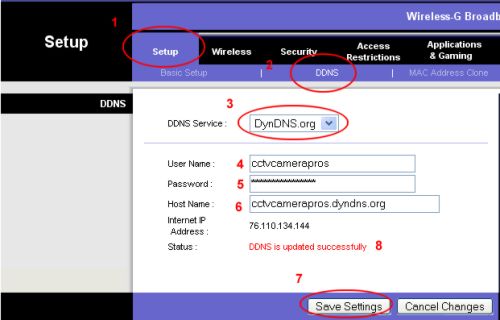
- Open the routers control panel by going to the IP address http://192.168.1.1/ in a web browser using the computer that is attached to your router. You will be prompt for a userid and password. If you did not setup a password on your router, the default for the WRT54G router is to leave the userid blank and enter "admin" for the password. Newer LinkSys routers default to "admin" for both the userid and password.
- Once you are logged into the router:
- Click on the "Setup" link
- Click on the "DDNS" link
- Select DynDNS.org from the DDNS Service drop down box
- Enter your DynDNS.org User name
- Enter your DynDNS Password
- Enter your DynDNS hostname that you setup
- Click "Save Settings"
- If setup was successful, you will see a success status message
 |
cctvcamerapros


DVR Viewer Setup for Internet & Network
Dual Codec Surveillance System DVRThe new CCTV Camera Pros dual codec JPEG DVR comes with a new DVR viewer software application. This software is called the integrated remote station (IRS) and is included on a CD that comes with the surveillance DVR. One of the applications in the IRS is a transmitter that allows you to watch your security cameras over the Internet or Intranet (internal network / LAN). The transmitter is meant to replace the DVR viewer that was used in the last version of the JPEG DVR. The integrated remote station also lets you review previously recorded surveillance video footage. The most recent version of the DVR viewer integrated remote station can be downloaded here: Integrated Remote Station. The integrated remote station, also referred to as the DVR viewer software, runs on a Microsoft Windows based computer.
AddThis
Please follow these setup instructions to setup remote Internet access for the dual codec JPEG DVR:
Assign your DVR an IP Address
Connect to your DVR on your LAN - Local Area Network
Setting up Port Forwarding on your Router
Setting up a Static DHCP IP address for your DVR
Remote Internet Setup
Creating and Configuring a Dymamic DNS Account
Setting up Dynamic DNS on your Router
Setup Remote Internet Connection
Assign an IP Address to your Surveillance DVR
In this section, we will assign your surveillance DVR an IP address. Make sure that your DVR is connected to your network by attaching an ethernet cable to the back of your DVR and attaching the other end to your router.
Login to your DVR by pressing the menu button on the DVR or on the wireless remote control.
When you are prompt to enter a password, just press the OK button on the DVR or remote. The default admin password for the DVR is blank. If you have already setup an admin password for your DVR, then enter this, then press OK.
From your DVRs System menu, select External Device.
On the External Device menu, select TCP/IP Setup.
On the TCP/IP Setup screen, select DHCP setup and press enter.
DHCP Automatic
On the DHCP setup screen, confirm that the DHCP mode is set to automatic. If it is not, adjust it so that it is by pressing the OK button.
DHCP Mode
Select Detect IP and press enter. The screen should refresh and populate values below. Note the IP address. This is the internal IP address that your router has assigned to your DVR. This is the IP address that you will setup port forwarding for.
After you have noted this IP address, select DHCP Mode and press OK. The mode will be changed Manual. This will ensure that your DVR will always be assigned the same IP address from your router. THIS IS IMPORTANT because if you loose power to your router, your router may assign your DVR a difference IP address and you will no longer be able to access the DVR remotely.
Press the menu button once to return to the TCP/IP setup screen.
On the TCP/IP setup screen, select IP config setup and press enter. On the IP config setup screen, confirm the port number of your DVR as seen below. The default port is 8000. If your DVR is not set to port 8000, please edit this value to set to 8000. NOTE: please ignore that the below screen shot shows port 50000. Port 50000 was used for the last version of the JPEG DVR.
IP Configuration Setup
Press the Menu several times on your DVR or remote until you exit out of the DVR menu system and see the live view of your cameras.
Local Area Network (LAN) DVR Viewer Access
The Integrated Remote Station allows you to access your security cameras locally on your netork as well as remotely over the Internet. Before proceeding with remote Internet access, it is a good idea to test out local access first. Also if you do plan on using the DVR viewer / Integrated Remote Station from on the same network as your DVR, you will get much better performance using your network's local IP address because you do not have to go out to the Internet for access and the performance of the video will be much faster from on the Intranet / LAN.
Install the most recent version of the Integrated Remote Station by downloading it from our website here: Integrated Remote Station Download. This version is always the most recent and should be used instead of the version that is on the CD that came with your DVR.
Save the file "JPEG-IRS-Setup.exe" to your windows desktop or select run. This is the installation file to install the Remote Station on your computer. If you saved the file, locate it and double click on it to begin installation. If you selected to run the program, the installation will begin after the file is done downloading.
Once the installation is complete, an icon will be created on your Windows desktop to launch the Integrated Remote Station. The icon will look like this:
Double-click on the icon to launch the program.
On the main IRS screen, click on the IRS Setup button.
On the IRS Setup screen, click on the Registering Site button. This will open a new Window where you can add the settings to connect to your DVR. This screen can be seen below.
A) Select Manul for CONNECTION.
B) Enter the IP address that you previously noted from your DVR's TCP/IP setup screen in the ADDRESS field. IMPORTANT: If any of the number fields in the IP address contain leading zeros, they should be removed. For example, if your DVR's IP address is 192.168.000.066, you should enter 192.168.0.66.
C) Enter 8000 for PORT
D) Enter admin for USER ID
E) Leave the password blank if you did not setup a password on your DVR or enter your DVR password if you did set one up.
Press OK when done.
You should now see an entry created for the local area connection (Intranet) information that you just entered in the Site Setup list on the IRS Setup screen. Click on the entry that you just created so that it is highlighted in green then press OK.
On the main Integrated Remote Station screen click on the Transmitter button. This will open the DVR transmitter which is that new DVR viewer application. You can note that also in this list there are other application. Although this application replaces the DVR Viewer, you can see there is still a Viewer application available. This is so that older legacy DVRs can still use the IRS application by using the DVR Viewer. Remember for the dual codec DVRs you should use the Transmitter because you will get better performance as it takes advantage of the H.264 MPEG-4 video encoding built into it.
Once the transmitter application opens, the connection information that you setup will be populated in the upper right. Click on the Connect button. The transmitter should fairly quickly connect to your DVR and display your security cameras.
If you are unable to connect, please go back and to this section and assign an IP address to your DVR.
If you are still unable to connect, continue to the next section to setup port forwarding on your router and complete it, then try to connect again.
Setup Port Forwarding on your Router
Port forwarding needs to be setup on your router so that a computer on the Internet can communicate remotely with your surveillance DVR. Click here if you want to learn more about how port forwarding works. Follow the below instructions to setup port forwarding.
Remember: Your DVR is going to use port 8000 (not 50000). 50000 was the default port for legacy non-dual codec DVRs).
If you do not have one of the routers listed below, please consult the manual for the router that you have or call your Internet Service Provider (ISP) for help if you are using a modem / router supplied by them. Tell them that you need to open and forward port 8000 to a DVR on your network.
LinkSys Port Forwarding setup instructions
D-Link Port Forwarding setup instructions
Setup static DHCP IP Address
Although you previously setup the DVR to always request the same IP address from your router when when you set the DHCP setting to manual in the DVR configuration, it is still a good idea to also configure your router to always assigns the same IP address to your DVR. Some routers support this feature and some do not. If your does not, it is OK to skip this section. The reason to set this up if you can is that if your router needs to be restarted or if there is a power failure, there is risk that your DVR will be assigned a new IP address. This will make the port forwarding setup that you just finished useless. Follow these instructions to setup a static IP address for your DVR.
D-Link Static IP Adress Setup
Remote Internet DVR Viewer Access
These last three sections are needed to setup the remote Internet access to your security cameras. The first thing that should be done to setup remote access is to find out if your Internet connection has a static or dynamic IP address. If you do not know, please contact your Internet provider and ask them. If you have a static IP address, you can skip the next two sections and jump to setting up the Internet connection to your surveillance DVR.
Creating and Configuring a Dynamic DNS Account
If your DVR will be connected to the Internet using a dynamic IP address (most cable and DSL connections), you need to setup a free service to manage the DNS (domain name service) for you so that you can access your DVR remotely without needing to keep track of your IP address. If you are unsure whether your Internet connection uses a static or dynamic IP address, please contact your Internet service provider. If you are using a static IP address, you can skip this section and the next section "Setup Dynamic DNS on your Router". If you are using a dynamic IP address, click here to setup your free dynamic DNS service. Return to this screen to continue after setting up your free dynamic DNS service.
Setup Dynamic DNS on your Router
Dynamic DNS is used when the Internet connection you will be using for your DVR uses a dynamic IP address. The settings that you setup using the DynDNS service will be added to your router's DDNS configuration to always keep your IP address up to date. The host name that you chose, something like "mydvr.dyndns.org", will always be kept up to date with the latest IP address assigned to your Internet connection by your ISP. This way you can use your host name to connect to your DVR remotely instead of trying to keep track of your dynamic IP address. CCTV Camera Pros has DDNS setup instructions for D-Link and LinkSys routers. The instructions are based on certain models but are likely the same or close to the same for other models of D-Link and LinkSys routers. If you need specific instructions for you router, please consult the manual that came with it and look under the section that has to do with Dynamic DNS support. Most modern router/switches support dynamic DNS.
LinkSys Router Setup - Dynamic DNS Service
D-Link Router Setup - Dynamic DNS Service
Setup Internet Connection to your DVR
The last step is to configure the Internet connection in the Integrated Remote Station for access from outside of your local network.
If the IRS is not already running, please start it by double-clicking on the JM-IRS icon on your desktop:
One the main IRS screen, click on the IRS Setup button.
We will be adding a new entry for your remote Internet connection. So when you are finished, if you also setup the LAN connection, you will have two connection configured in the IRS setup. One for local access to your DVR and one for remote Internet access.
On the IRS Setup screen, click on the Registering Site button. This will open a new Window where you can add the settings to connect to your DVR. This screen can be seen below.
A) Select Manul for CONNECTION.
B) In the Address field, enter the static IP address that your ISP gave you if you are using a static IP address. If you are using a dynamic IP address and finished setting up your DynDNS account, please enter the host name that you setup when registering.
C) Enter 8000 for PORT
D) Enter admin for USER ID
E) Leave the password blank if you did not setup a password on your DVR or enter your DVR password if you did set one up.
Press OK when done.
You should now see an entry created for the Internet connection information that you just entered in the Site Setup list on the IRS Setup screen. Click on the Internet entry that you just created so that it is highlighted in green then press OK.
On the main Integrated Remote Station screen click on the Transmitter button. This will open the DVR transmitter which is that new DVR viewer application. You can note that also in this list there are other application. Although this application replaces the DVR Viewer, you can see there is still a Viewer application available. This is so that older legacy DVRs can still use the IRS application by using the DVR Viewer. Remember for the dual codec DVRs you should use the Transmitter because you will get better performance as it takes advantage of the H.264 MPEG-4 video encoding built into it.
Once the transmitter application opens, the connection information that you setup will be populated in the upper right. Click on the Connect button. The transmitter should fairly quicky connect to your DVR and display your security cameras.
DVR Viewer / Transmitter Troubleshooting Techniques
Ensure that your internal IP address to your DVR has not changed buy going through this section again to assign an IP address to your DVR. If your IP address changed, then you need to setup port forwarding rules again based on that new IP address, so go here to setup port forwarding on your router.
Make sure that you have the correct IP address for your Internet connection. Ask your ISP for your IP address if using a static IP address. You can also look up the IP address of your internet connection here:
Get My IP Address
Make sure that your router does not have any advanced firewall rules in place by consulting the manual.
Call your ISP and ask them if your modem has a firewall that you can disable.
Call your ISP and make sure that they do not block any incoming ports to your Internet connection.
File formats, resolutions and file systems
DVRs can usually record and play H.264, MPEG-4 Part 2, MPEG-2 .mpg, MPEG-2 .TS, VOB and ISO images video, with MP3 and AC3 audio tracks. They can also display images (JPEG and PNG) and play music files (MP3 and Ogg).
Some devices can be updated to play and record in new formats.
Recordings from standard-definition television usually have 480p/i/576p/i while HDTV is usually in 720p/1080i.
DVRs usually record in proprietary filesystems for copy protection, although some can use FAT filesystems.
 The images show the DVR viewer software that comes with the 8 channel DVR. This software allows you to view your security cameras remotely over the Internet using a Internet Explorer from your Windows XP and an Internet connection. DVR viewer software available in 4, 8, and 16 channel models.
Actual images are even clearer that what is seen on this webpage. Surveillance images that are viewed on location are always much higher quality than taken remotely over the Internet because of bandwidth / connectivity limitations.
These images have been screen captured and converted/compressed to Internet format which lowers their quality.


Some devices can be updated to play and record in new formats.
Recordings from standard-definition television usually have 480p/i/576p/i while HDTV is usually in 720p/1080i.
DVRs usually record in proprietary filesystems for copy protection, although some can use FAT filesystems.

Actual images are even clearer that what is seen on this webpage. Surveillance images that are viewed on location are always much higher quality than taken remotely over the Internet because of bandwidth / connectivity limitations.
These images have been screen captured and converted/compressed to Internet format which lowers their quality.

DVR viewer software 4 from 8 channel models.
With the appearance of 4 images alternately
With the appearance of 4 images alternately

Problems and solutions
| Camera is very hot temperatures |
|
If you use "mini camera" like this
|

|
|
and when used within 24 hours, the temperature of the camera "very hot", you must lower the voltage, use the 8 Volt
|
|
The face of the dark Fighting light: in too many instances CCTV cameras are not used to their best advantage. When positioned facing the bright outside daylight this camera struggles to record anything other than a dark silhouette as our target individual enters the building |
 |
|
to get a clearer picture, it takes infra red which leads to the object
|

|
LAN Cable

Use a wired "cross" connection to connect the DVR to HAP
1 to 3, 2 to 6, 3 to 1, 4 to 4, 5 to 5, 6 to 2, 7 to 7, 8 to 8 (like the picture above)

CCTV maintenance
CCTV is the recipient of the image on the sensor, if sensor is dirty, it needs cleaning, use a soft brush to clean the sensor

Setting Voltage
How to find a good picture:
Before you use a new camera, adjust voltage to suit the needs of the camera.

Before you use a new camera, adjust voltage to suit the needs of the camera.

Langganan:
Komentar (Atom)